---------------------------------------
This tutorial will guide you through building a simple web service using spring framework. This tutorial assumes that you have gone through Tutorials 1-10 & the source code for tutorials 1-10. Also refer to spring-ws-reference.pdf (http://www.lulu.com/items/volume_62/1253000/1253871/1/print/1253871.pdf & http://static.springframework.org/spring-ws/site/reference/pdf/spring-wsreference.pdf) for further information.
Step 0: Open command prompt and the go to project base directory. Here E:\aarruunn>

Step 1: Create a project named simpleWeb1. Run the following command in a command window:
C:\aarruunn> mvn archetype:create -DarchetypeGroupId=org.springframework.ws
-DarchetypeArtifactId=spring-ws-archetype -DarchetypeVesrion=1.0.0
-DgroupId=paria.league.ws -DartifactId=simpleWeb1
Note: Maven2 archetype:create is deprecated so first command may not be worked then you get error. Please used second command.

Or
C:\ aarruunn> mvn archetype:generate
-DarchetypeGroupId=org.springframework.ws
-DarchetypeArtifactId=spring-ws-archetype -DarchetypeVesrion=1.0.0
-DgroupId=paria.league.ws -DartifactId=simpleWeb1
In second command ask for the package name verification Y:. Provide y and press enter button to create project structure.
package: paria.league.ws
Y: : y

Step 2: Now you should have the simpleWeb1 project with some basic files like pom.xml simpleWeb1 folder and web.xml, spring-ws-servlet.xml under WEB-INF folder.

Step 3: Next step is to generate eclipse metadata using the mvn command as shown below: C:\tutorials\simple-tutorial\simpleWeb2>mvn eclipse:eclipse

Step 4: Open the pom.xml file under “C:\aarruunn\simpleWeb1” in a notepad and modify it to look as shown below.
<?xml version="1.0" encoding="UTF-8"?>
<project>
<!--<parent>
<artifactId>SLAAWorkspace</artifactId>
<groupId>com.mytutorial</groupId>
<version>1.0</version>
</parent>
-->
<modelVersion>4.0.0</modelVersion>
<groupId>com.mytutorial</groupId>
<artifactId>simpleWeb1</artifactId>
<packaging>war</packaging>
<name>simpleWeb1 Spring-WS Application</name>
<version>1.0-SNAPSHOT</version>
<url>http://www.springframework.org/spring-ws</url>
<build>
<finalName>simpleWeb1</finalName>
</build>
<dependencies>
<!-- Spring web services -->
<dependency>
<artifactId>spring-xml</artifactId>
<groupId>org.springframework.ws</groupId>
<version>1.0.0</version>
<exclusions>
<exclusion>
<groupId>org.springframework</groupId>
<artifactId>spring-core</artifactId>
</exclusion>
<exclusion>
<groupId>org.springframework</groupId>
<artifactId>spring-beans</artifactId>
</exclusion>
<exclusion>
<groupId>commons-logging</groupId>
<artifactId>commons-logging</artifactId>
</exclusion>
<exclusion>
<groupId>jdom</groupId>
<artifactId>jdom</artifactId>
</exclusion>
<exclusion>
<groupId>dom4j</groupId>
<artifactId>dom4j</artifactId>
</exclusion>
</exclusions>
</dependency>
<dependency>
<artifactId>spring-oxm-tiger</artifactId>
<groupId>org.springframework.ws</groupId>
<version>1.0.0</version>
<exclusions>
<exclusion>
<groupId>org.springframework</groupId>
<artifactId>spring-core</artifactId>
</exclusion>
<exclusion>
<groupId>org.springframework</groupId>
<artifactId>spring-beans</artifactId>
</exclusion>
<exclusion>
<groupId>commons-logging</groupId>
<artifactId>commons-logging</artifactId>
</exclusion>
<exclusion>
<groupId>com.thoughtworks.xstream</groupId>
<artifactId>xstream</artifactId>
</exclusion>
</exclusions>
</dependency>
<dependency>
<artifactId>spring-ws-core-tiger</artifactId>
<groupId>org.springframework.ws</groupId>
<version>1.0.0</version>
<exclusions>
<exclusion>
<groupId>org.springframework</groupId>
<artifactId>spring-core</artifactId>
</exclusion>
<exclusion>
<groupId>org.springframework</groupId>
<artifactId>spring-beans</artifactId>
</exclusion>
<exclusion>
<groupId>org.springframework</groupId>
<artifactId>spring-context</artifactId>
</exclusion>
<exclusion>
<groupId>org.springframework</groupId>
<artifactId>spring-web</artifactId>
</exclusion>
<exclusion>
<groupId>org.springframework</groupId>
<artifactId>spring-webmvc</artifactId>
</exclusion>
</exclusions>
</dependency>
<dependency>
<groupId>com.sun.xml.messaging.saaj</groupId>
<artifactId>saaj-impl</artifactId>
<version>1.3</version>
<scope>runtime</scope>
<exclusions>
<exclusion>
<groupId>javax.activation</groupId>
<artifactId>activation</artifactId>
</exclusion>
</exclusions>
</dependency>
<dependency>
<groupId>javax.activation</groupId>
<artifactId>activation</artifactId>
<version>1.1</version>
</dependency>
<dependency>
<groupId>javax.servlet</groupId>
<artifactId>servlet-api</artifactId>
<version>2.4</version>
<scope>provided</scope>
</dependency>
<dependency>
<groupId>jdom</groupId>
<artifactId>jdom</artifactId>
<version>1.0</version>
</dependency>
<dependency>
<groupId>jaxen</groupId>
<artifactId>jaxen</artifactId>
<version>1.1</version>
</dependency>
<dependency>
<groupId>javax.xml.soap</groupId>
<artifactId>saaj-api</artifactId>
<version>1.3</version>
<scope>runtime</scope>
</dependency>
<dependency>
<groupId>org.springframework</groupId>
<artifactId>spring</artifactId>
<version>2.0.6</version>
</dependency>
</dependencies>
</project>
Note: The
Step 5: We can now import this project into eclipse. File => Import and then

Clieck Next => Browse select simpleWeb1 project structure and OK.

Click on Finish


Step 6: Next step is to create a folder “java” for the java files under “src/main”. Right click on simpleWeb1 and select “properties”. Click on
simpleWeb1 => properties => addFolder

Click on Create New Folder provide java and Finish

Step 7: Now define the input XML file and its contract. Create a new folder “etc” under “simpleWeb1” for any miscellaneous files like “simple.xml” that are not packaged.
<simpleRequest>
<firstname>John</firstname>
<surname>Smith</surname>
</simpleRequest>

Step 8: The next step is to define the schema definition for the above xml file. The “simple.xsd” should be created under “C:\tutorials\simple-tutorial\simpleWeb2\src\main\webapp\WEBINF” as shown below:
<xs:schema xmlns:xs="http://www.w3.org/2001/XMLSchema"
targetNamespace="http://mytutorial.com/schemas"
xmlns="http:// paria.league.ws/schemas">
<xs:element name="firstname">
<xs:complexType mixed="true" />
</xs:element>
<xs:element name="surname">
<xs:complexType mixed="true" />
</xs:element>
<xs:element name="simpleRequest">
<xs:complexType>
<xs:sequence>
<xs:element ref="firstname" />
<xs:element ref="surname" />
</xs:sequence>
</xs:complexType>
</xs:element>
</xs:schema>

Step 9: The web.xml can remain as it is.

Step 10: With spring-ws, you do not have to define the .wsdl file. It will be automatically generated based on your simple.xsd file you just created and the simple-ws-servlet.xml (the file convention is -servlet.xml) file you are about to define.
<?xml version="1.0" encoding="UTF-8"?>
<beans xmlns="http://www.springframework.org/schema/beans"
xmlns:xsi="http://www.w3.org/2001/XMLSchema-instance"
xsi:schemaLocation="http://www.springframework.org/schema/beans
http://www.springframework.org/schema/beans/spring-beans-2.0.xsd">
<bean id="simpleEndPoint" class="paria.league.ws.SimpleEndPoint" />
<bean class="org.springframework.ws.server.endpoint
.mapping.PayloadRootQNameEndpointMapping">
<property name="mappings">
<props>
<prop key="simpleRequest">simpleEndPoint</prop>
</props>
</property>
<property name="interceptors">
<bean class="org.springframework.ws.server.endpoint
.interceptor.PayloadLoggingInterceptor" />
</property>
</bean>
<bean id="simple" class="org.springframework.ws.wsdl.wsdl11
.DynamicWsdl11Definition">
<property name="builder">
<bean class="org.springframework.ws.wsdl.wsdl11.builder
.XsdBasedSoap11Wsdl4jDefinitionBuilder">
<property name="schema"
value="/WEB-INF/simple.xsd" />
<property name="portTypeName" value="simple" />
<property name="locationUri"
value="http://localhost:8080/simpleWeb1/
simpleService/" />
<property name="targetNamespace"
value="http://mytutorial.com/definitions" />
</bean>
</property>
</bean>
</beans>

Step 11: The next step is to define the end point class as shown below to read the incoming XML request and construct an XML response back to the caller. Create a new package paria.league.ws under “resource” and then create the java file “SimpleEndPoint.java”.
package paria.league.ws;
import org.springframework.ws.server.endpoint.AbstractDomPayloadEndpoint;
import org.w3c.dom.Document;
import org.w3c.dom.Element;
public class SimpleEndPoint extends AbstractDomPayloadEndpoint {
public SimpleEndPoint() {
System.out.println("Instantiated .............. ");
}
protected Element invokeInternal(Element simpleRequest,
Document document) throws Exception {
System.out.println("Testing End Point.......................");
String fn = simpleRequest.getElementsByTagName("firstname")
.item(0).getTextContent();
String sn = simpleRequest.getElementsByTagName("surname").item(0)
.getTextContent();
String requestText = "firstname=" + fn + " " + "surname=" + sn;
System.out.println("request is for: " + requestText);
Element responseElement = document
.createElement("simpleResponse");
responseElement.setTextContent(fn + " " + sn);
return responseElement;
}
}

Step 12: Finally we need to create a Web Services client named “Client.java” to invoke our web service.
package paria.league.ws;
import java.io.StringReader;
import javax.xml.transform.stream.StreamResult;
import javax.xml.transform.stream.StreamSource;
import org.springframework.ws.client.core.WebServiceTemplate;
public class Client {
private static final String MSG =
"<simpleRequest>
<firstname>John</firstname>
<surname>Smith</surname>
</simpleRequest>";
private static final String URL = "http://localhost:8080/simpleWeb1/simpleService/";
public static void main(String[] args) {
WebServiceTemplate template = new WebServiceTemplate();
StreamSource source = new StreamSource(new StringReader(MSG));
StreamResult result = new StreamResult(System.out);
template.sendSourceAndReceiveToResult(URL, source, result);
}
}

Step 13: Add jar files for build project.
commons-httpclient-3.1.jar
commons-logging-1.1.1.jar
spring-beans-2.5.6.jar
spring-context-2.0.4.jar
spring-core-2.5.6.jar
spring-ws-core-1.0.0.jar
spring-xml-1.0.0.jar

Step 14: Open consol and go to workspace directory and build package war file.

Step 15: Write command line build E:\SLAAWorkSpace\simpleWeb1> mvn package

Step 16: War file will be store in target folder in the project.

Step 17: Copy war file and past it in webapps directory in tomcat. Deploy the “simpleWeb1” war file into Tomcat under eclipse and start the Tomcat Server.

Step 18: start the Tomcat Server.
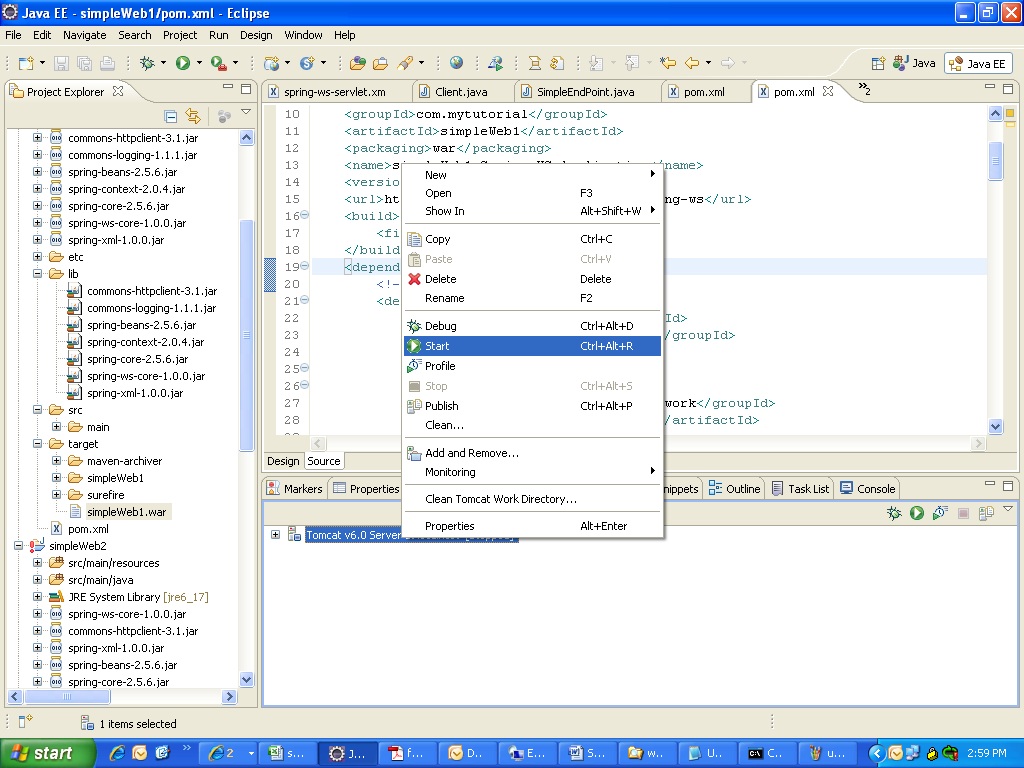
Step 18: Open up a browser and type the following URL http://localhost:8080/simpleWeb1/simpleService/simple.wsdl to look at the generated simple.wsdl file as shown below:

Step 18: Now run client and get the response. Right clienk on client.java =>run as =>java application

Client output

This comment has been removed by the author.
ReplyDelete