------------------------------------------------
There are different types of deployment procedures are available for different server container in the software industry. Here we are following one of them as .war file in Tomcat. Deployment procedure steps are giving bellow:-
A. Application .war file deployment procedure
1. Install Java-5 or upper version (we are using Java-6)

2. Download and Install Tomcat-6.0

3. Download Axis2-1.5.0 (binary distribution) or upper version (we are using Axis2-1.5.1).
4. Extract and place Axis2 under Tomcat installation directory.

Note: To open environment path setting got to start=>right click on Computer=>properties=>Advanceseting or advance tab=>Environment Variables
5. Set classpath CLASSPATH as java installation bin directory.

6. Set classpath CATELINA_HOME as tomcat-6.0 installation directory.

7. Set classpath AXIS2_HOME as Axis2 folder path.

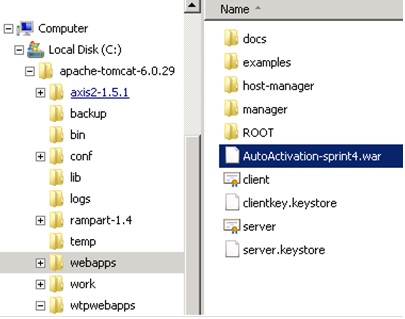
8. Copy application .war file in webapps (32 bit OS) or wtpwebapps (64 bit OS) directory in tomcat.
9. Start Tomcat server.
When server will start then tomcat extract war file and create a folder for the application. This folder contains all class files, library files and configuration file to run the application in the container.
10. Stop Tomcat server.
11. Go to webapps or wtpwebapps directory and remove the application .war file.
12. Now deployment is completed.
B. Application .aar file deployment procedure
1. Install Java-5 or upper version (we are using Java-6)

2. Download and Install Tomcat-6.0

3. Download Axis2-1.5.0 (binary distribution) or upper version (we are using Axis2-1.5.1).
4. Extract and place Axis2 under Tomcat installation directory.

5. Download Axis2.war file.
6. Copy or deploy Axis2.war file in tomcat webapps (32 bit OS) or wtpwebapps (64 bit OS) directory.

7. Set classpath CLASSPATH as java installation bin directory.

8. Set classpath CATELINA_HOME as tomcat-6.0 installation directory.

9. Set classpath AXIS2_HOME as Axis2 folder path.

10. Start Tomcat server.
When server will start then tomcat extract axis2.war file and create axis2 folder for the application web service container. Now check axis2 application service link.
a. Open web browser and type the URL to access axis2 application like http://hostname:port/axis2/ [http://localhost:8080/axis2/]

b. In this link you will get service link for web service details. http://hostname:port/axis2/service/ [http://localhost:8080/axis2/service/]

11. Stop Tomcat server.
12. Go to webapps or wtpwebapps directory and remove the axis2.war file.
13. Now deploy web service application .aar file in axis2.
a. Open browser and type URL http://hostname:port/axis2/

b. Click on “administration” link and login using axis2 credential.
User name : admin
Password : axis2

c. Click on “upload web service” to upload .aar file

d. Select .aar file and click on “Upload” button. “Web service uploaded successfully” message will be display after upload.

e. Click on “Log out” link.
f. Now click on “service” link to see the web service.

g. Click on web service to see the WSDL file of web service.
14. Here deployment is completed.
No comments:
Post a Comment