Friday, October 22, 2010

Spring with in a Day Part-10

Steeps fpr Spring Web Application Transaction
-------------------------------------------------------------
 Copy the jar files those are supplied by the spring people to D:\sprlibs directory.
 Copy commons-dbcp-1.2.2.jar, commons-pool-1.3.jar, commons-collections-3.2.jar and ojdbc14.jar are to the same directory.
 Remove hibernate2.jar and spring-hibernate2.jar files instead of using the spring jar file supplied by eclipse people used by provided by spring people.
 Create table bacc(aid number(10) Primary key, balance number(10,2));
Insert into back values (1,10000);
Insert into back values (2,20000);
 MyEclipse IDE will able to generate the DAO class can used by spring application.
 For back table MyEclipse generates –
pack.Bacc (POJO class), back.hbm.xml (mapping file), pack.BaccDAO (DAO class).


Transaction Service Code –
---------------------------------------------
package pack;
public class FTManager {
private BaccDAO dao;
public void setDAO(BaccDAO dao) {
this.dao=dao;
}
public void trasferFunds(Long aidOne, Long aidTwo, double amt) throws Exception {
Bacc b1,b2;
b1=dao.findById(aidOne);
b2=dao.findById(aidTwo);
b1.setBalance(new Double(b1.getBalance().doubleValue()-amt));
b1.setBalance(new Double(b1.getBalance().doubleValue()+amt));
}
}

Provide Main application Classes -
---------------------------------------------
package pack;
public class TxManager {
public static void main (Sting [] args) throws Exception {
ApplicationContext sc = new ClassPathXmlApplicationContext (“applicationContext.xml”);
Object obj;
obj = sc.getBean(“fmt”);
FTManager ftm=(FTManager) obj;
ftm.transaferFunds(new Long(1),new Long(2),1000);
}
}

Provide the info about the Service classes in applicationContext.xml file -
------------------------------------------------------------------------------
< id="”txManager”" class="”org.springframework.orm.hibernate3.HibernateTransactionManager”">
< name="”sessionFactory”">
< local="”sfBean”">< /ref>
< /property>
< /bean>
< id="”baccDAO”" class="”pack.BaccDAO”">
< name="”sessionFactory”">
< local="”sfBean”">< /ref>
< /property>
< /bean>
< id="”ftmTarget”" class="”pack.FTManage”">
< name="”dao”">
< local="”baccDAO”">< /ref>
< /property>
< /bean>
< id="”fmt”" class="”org.springframework.transaction.intercepter.TransactionProxyFactoryBean”">
< name="”transactionManager”">
< local="”txManager”">< /ref>
< /property>
< name="”target”">
< local="”fmtTarget”">< /ref>
< /property>
< name="”transactionAttributes”">
<>
< key="”*”" value="”PROPAGATION_REQUIRES_NEW,">
< /entry>
< /map>
< /property>
< /bean>

o Here ‘*’ represents all the methods.
o The Transaction Manager will start the new transaction before executing the business method.
o Transaction Manager roleback the transaction when exception will be thrown by the business method.

Note:
For configuring multiple business service classes we can use the configuration info provided in documentation of TransactionProxyFactoryBean.


As part of a spring based application we can provide the code to manage the transaction but this is not a recommended approach. We can use declarative transaction management by providing/ declaring the info about how the transaction has to be managed using transactionAttributes.
By default spring will roleback the transaction if an exception of type java.lang.Exception of its subclasses is thrown.
If we provided +java.lang.Exception as part of transactionAttributes the transaction will be committed when the exception will be thrown.

< key="”bmOne”" value="”PROPAGATION_REUIRED_NEW,">< /entry>

o PROPAGATION_REUIRED_NEW
o PROPAGATION_REUIRED (default)
o PROPAGATION_MANDATORY
o PROPAGATION_SUPPORTED
o PROPAGATION_NOT_SUPPORTED
o PROPAGATION_NEVER


PROPAGATION_REUIRED_NEW
-----------------------------------
Spring will start a new transaction before executing the method. The transaction will be started even if there is an transaction.


PROPAGATION_REUIRED
-----------------------------------
If we use PROPAGATION_REQUIRED spring will start a new transaction if there is no transaction. If there is a transaction, if we use PROPAGATION_REQUIRED then the method will be executed as part of existing transaction.

PROPAGATION_MANDATORY
-----------------------------------
If there is no transaction then it is considered to be illegal. If there is a transaction then method will be executed as part of the existing transaction.

PROPAGATION_SUPPORTED
-----------------------------------
If there is no transaction then method will be executed without transaction. If there is a transaction method will be executed as part of existing transaction.

PROPAGATION_NOT_SUPPORTED
-----------------------------------
If there is no transaction then method will be executed without transaction. If there is a transaction method will be executed without transaction.

PROPAGATION_NEVER
-----------------------------------
If there is no transaction then method will be executed without transaction. If there is a transaction will be not executed and this is considered to be illegal.

Note:
It is recommended to use the above three values when we want to perform the DB operation from a business method.
Spring with in a Day Part-9

Aspect Oriented Programming (AOP) –
-----------------------------------------------
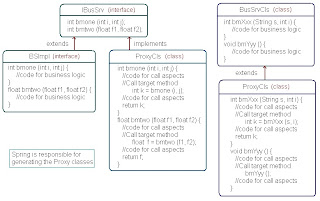
AOP stands for Aspect Oriented Programming. It simplifies the development of Application.


Provide the Service class –
------------------------------------------
package pack;
public interface IBusSrv {
int bmone (int I, int j);
float bmtwo (float f1, float f2);
}
package pack;
public class BSImpl implements IBusSrv {
public int bmone (int i, int j) {
System.out.println(“-----bmone()------“);
Return i+j;
}
public float nmtwo (float f1, float f2) {
System.out.println(“-------bmtwo()-------“);
return f1+f2;
}
}

package pack;
public class BusSrvCls {
public void bXxx(String s, int i) {
System.out.println(“--------bmXxx()---------“);
}
public void bmYyy() {
System.out.println(“----------bmYyy()------“);
}
}

Provide Aspect Classes –
-----------------------------------------
package pack;
import org.springframework.apo.MethodBeforeAdvice;
import org.springframework.apo.AfterReturningAdvice;
public class OurAspect implements MethodBeforeAdvice, AfterReturningAdvice {
public void before (Method met, Object[] args, Object target) throws Throwable {
System.out.println(“…….before…..”+met.getName());
System.out.println(“…….before…..”+args.length);
System.out.println(“…….before…..”+target.getClass());
}
public void afterReturning (Object rval, Method met, Object[] args, Object target)
throws Throwable {
System.out.println(“…….aR…..”+rval);
System.out.println(“…….aR…..”+met.getName());
System.out.println(“…….aR…..”+args.length);
System.out.println(“…….aR…..”+target.getClass());
}
}


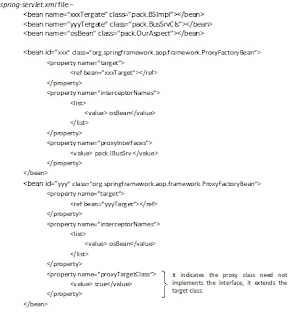
Provide the info about the Service classes and Aspect classes in spring-servlet.xml file -
-----------------------------------------------------------------------------------
spring-servlet.xml file –
< bean name=”xxxTergate” class=”pack.BSImpl”>< /bean>
< bean name=”yyyTergate” class=”pack.BusSrvCls”>< /bean>
< bean name=”osBean” class=”pack.OurAspect”>< /bean>

< bean id=”xxx” class=”org.springframework.aop.framework.ProxyFactoryBean”>
< property name=”target”>
< ref bean=”xxxTarget”>< /ref>
< /property>
< property name=”interceptorNames”>
< list>
< value> osBean< /value>
< /list>
< /property>
< property name=”proxyInterfaces”>
< value> pack.IBusSrv < /value>
< /property>
< /bean>
< bean id=”yyy” class=”org.springframework.aop.framework.ProxyFactoryBean”>
< property name=”target”>
< ref bean=”yyyTarget”>< /ref>
< /property>
< property name=”interceptorNames”>
< list>
< value> osBean< /value>
< /list>
< /property>
< property name=”proxyTargetClass”>
< value> true< /value>
< /property>
< /bean>


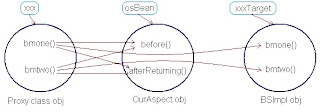
When the application calls getBena(“xxx”) method of spring container object a proxy object will be return. This object contains the code that used our aspect or advice and the target object based on BSImpl object.


When bmone() method is invoked on the Proxy, it calls before() method, bmone() method on target object and finally it calls afterReturning() method. OurAspect acts as an intercepter.


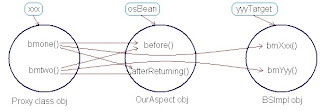
When the application calls getBean(“yyy”) method of the spring container object, a proxy object will be return and this object takes care of using OurAspect and BusServCls object.

Provide Main application Classes –
-----------------------------------------------------
package pack;
public class AOPTestClass {
public static void main (Sting [] args) throws Exception {
ApplicationContext sc = new ClassPathXmlApplicationContext
(“applicationContext.xml”);
Object obj;
Obj = sc.getBean(“xxx”);
IBusSrv ibs = (IBusSrv) obj;
ibs.bmone(10,20);
ibs.bmtwo(10.01f, 20.02f);
obj = sc.getBean(“yyy”);
BusSrvCls bsc = (BusSrvCls) obj;
bsc.bmXxx(“aa”, 10);
bsc.bmYyy();
}
}

Crosscutting concern –
-------------------------------
The code to manage the transactions and the code to manage the security is required at multiple parts and hence these are called as Crosscutting concern.

Disadvantage of OOPs –
-------------------------------
OOPs allows us to reuse the code by creating subclasses and subclasses, but creating the sense the super classes does not make sense in some classes (creating a Person class as a sub class of Dog class, creating TransactionManager as subclass of SecurityMamager does not make sense)

AOP solves OOPs problem –
-------------------------------
Aspect Oriented Programming solves this problem. It allows us to reuse the code. An aspect is a crosscutting concern. Login, Security management, Transaction management are the good example of aspect.


Join-Point –
-------------------------------
Using an aspect is called as advising. The point at which the aspect is advice is called as join-point. Before calling a method and after calling a method are examples of joint-points.

The code of OurAdvice is used along with BSImpl and BusSrvCls that is we have reused the code of OurAspect in multiple classes. Spring supports the transaction management by using aspect oriented programming.

Spring with in a Day Part-8

Form Controller mechanism
----------------------------------------------
We can deal with the forms in our application are implementing the controller class as the subclasses of AbstructWizardFormController or SimpleFormController.

FromView –
------------------------
The server face generates the form to get input is called form view or the JSP that generates the input form is called as form view.

Success View –
------------------------
When the user provides the data in the above form, the application must store the data in the database and generates the output including that completed the operating successfully, the JSP that is responsible to generating the output is called as success view.

SimpleFormController
------------------------
The internal code of SimpleFormController assumes the browser has send the request for form if the request of type GET and it assumes the form is submitted if the request of type POST.

Procedure for using SimpleFormController –
--------------------------------------------------
Provide a form view -
------------------------------
JSP code (npform.jsp):-
< %@ taglib prefix=”c” uri=”http://java.sun.com/jstl/core” %>
< %@ taglib prefix=”spring” uri=”http://www.springframework.org/tags” %>
< %@ page isELIgnored=”true” %>
< form method=”post” action=”sfh.html”>
Prod id: < input type=”text” name=”pid”>< /br>
< spring:bind path=”pcb.pid”>
< c:forEach var=”emsg” items=”${status.errorMessages}”>
< c:out value=”${emsg}”/>
< /c:forEach>
< /spring:bind>
Prod Name: < input type=”text” name=”pname”>< /br>
< spring:bind path=”pcb.pname”>
< c:forEach var=”emsg” items=”${status.errorMessages}”>
< c:out value=”${emsg}”/>
< /c:forEach>
< /spring:bind>
Price: < input type=”text” name=”price”>< /br>
< spring:bind path=”pcb.price”>
< c:forEach var=”emsg” items=”${status.errorMessages}”>
< c:out value=”${emsg}”/>
< /c:forEach>
< /spring:bind>
< input type=”submit” value=”Store”>< /br>
< /form>


Provide Success View –
--------------------------------------
JSP code (pds.jsp):-
< %@ taglib prefix=”c” uri=”http://java.sun.com/jstl/core” %>
< %@ taglib prefix=”spring” uri=”http://www.springframework.org/tags” %>
< %@ page isELIgnored=”true” %>
Successfully Store the Product < br>
Prod Id = ${requestScope.peb.pid} < br>
Prod Name = ${requestScope.peb.pname} < br>
Prod Price = ${requestScope.peb.price} < br>

Provide the command bean class –
-------------------------------------------
package pack;
public class ProductCB {
int pid;
String pname;
float price;
//add setter and getter for all properties
}

Provide code for validation –
--------------------------------------------
//add validator code

Provide Code for Controller class –
---------------------------------------------
package pack;
public class PDSController extends SimpleFormController {
public PDSController () {
this.setCatchSecond(1);
this.setCommandName(“pcb”);
this.setCommandClass(ProductCB.class);
this.setFormView(“npform”);
this.setSuccessView(“pds”);
}
public void doSubmitAction(Object cmd) throws Exception {
ProductCB cb=(ProductCB) cmd;
System.out.println(“Prod id=”+cb.getPid());
}
}

The method doSubmitAction() will be executed only when the data provided by user is valid. If this method throws no exception then the successView will be executed.

Provide the info about the controller in spring-servlet.xml file -
-------------------------------------------------------------------------------
spring-servlet.xml file –
< bean name=”/sfh.htm” class=”pack.PDSController”>< /bean>

SimpleFormController activities when it deals with the form -
-------------------------------------------------------------------------------


Procedure for using AbstructWizardFormController – (Multi Form Handle)
---------------------------------------------------------------------------------
Provide the info about the controller in spring-servlet.xml file -
---------------------------------------------------------------------------------
spring-servlet.xml file –
< bean name=”/mfh.htm” class=”pack.MFController”>< /bean>

Provide the command bean class –
-----------------------------------------------------------
package pack;
public class UserRegCB {
String username;
Stirng pwdOne;
Stirng pwdTwo;
int age;
Stirng fatherName;
Stirng motherName;
Stirng address;
Stirng email;
Stirng contactNo;
//add setter and getter for all properties
}


Provide Code for Controller class –
-----------------------------------------------------------------
package pack;
public class MFController extends
AbstructWizardFormController {
public MFController () {
this.setCommandName(“urcb”);
this.setCommandClass(UserRegCB.class);
String pages[] = new String[3];
pages[0] = “frmz”;
pages[1] = “frmone”;
pages[2] = “frmtwo”;
this.setPages(pages);
}
protected void validatePage(Object cmd, Errors errors, int page) {
switch(page){
case 0: //call page zero validation
break;
case 1: //call page one validation
break;
case 2: //call page two validation
break;
}
}
protected ModelAndView processFinish(HttpServletRequest request,
HttpServletReqponse response, Object cmd, BindException be) {
UserRegCB cb=(UserRegCB) cmd;
//call business logic service class
ModelAndView mav = new ModelAndView();
mav.addAllObjects(be.getModel());
mav.setViewName(“ur”);
}
}

In the above application we are provided the business logic in the controller class. This is a recommended approach; we must provide a separate set of classes called as Business Service classes for the implementation of the business logic.

Provide a form view -
--------------------------------------
JSP code (frmz.jsp):-
< %@ taglib prefix=”c” uri=”http://java.sun.com/jstl/core” %>
< %@ taglib prefix=”spring” uri=”http://www.springframework.org/tags” %>
< %@ page isELIgnored=”true” %>
< form method=”post” action=”mfh.html”>
< input type=”hidden” name=”_page0” value=”true”/>
< input type=”hidden” name=”_target1” value=”true” />
User Name: < input type=”text” name=”userName”>< /br>

< c:forEach var=”emsg” items=”${status.errorMessages}”>
< c:out value=”${emsg}”/>
< /c:forEach>
< /spring:bind>
Password: < input type=”text” name=”pwdOne”>< /br>
< spring:bind path=”pcb.pwdOne”>
< c:forEach var=”emsg” items=”${status.errorMessages}”>
< c:out value=”${emsg}”/>
< /c:forEach>
< /spring:bind>
Retype Password: < input type=”text” name=”pwdTwo”>< /br>
< spring:bind path=”pcb.pwdTwo”>
< c:forEach var=”emsg” items=”${status.errorMessages}”>
< c:out value=”${emsg}”/>
< /c:forEach>
< /spring:bind>
< input type=”submit” value=”Next”>< /br>
< /form>

JSP code (frmone.jsp):-
------------------------------------------
< %@ taglib prefix=”c” uri=”http://java.sun.com/jstl/core” %>
< %@ taglib prefix=”spring” uri=”http://www.springframework.org/tags” %>
< %@ page isELIgnored=”true” %>
< form method=”post” action=”mfh.html”>
< input type=”hidden” name=”_page1” value=”true”/>
< input type=”hidden” name=”_target2” value=”true” />
Age: < input type=”text” name=”age”>< /br>
< spring:bind path=”pcb.age”>
< c:forEach var=”emsg” items=”${status.errorMessages}”>
< c:out value=”${emsg}”/>
< /c:forEach>
< /spring:bind>
Father’s Name: < input type=”text” name=”fatherName”>< /br>
< /spring:bind path=”pcb.fatherName”>
< c:forEach var=”emsg” items=”${status.errorMessages}”>
< c:out value=”${emsg}”/>
< /c:forEach>
< .spring:bind>
Mother Name: < input type=”text” name=”motherName”>< /br>
< spring:bind path=”pcb.motherName”>
< c:forEach var=”emsg” items=”${status.errorMessages}”>
< c:out value=”${emsg}”/>
< /c:forEach>
< /spring:bind>
< input type=”submit” value=”Next”>< /br>
< /form>

JSP code (frmtwo.jsp):-
------------------------------------
< %@ taglib prefix=”c” uri=”http://java.sun.com/jstl/core” %>
< %@ taglib prefix=”spring” uri=”http://www.springframework.org/tags” %>
< %@ page isELIgnored=”true” %>
< form method=”post” action=”mfh.html”>
< input type=”hidden” name=”_page2” value=”true”/>
< input type=”hidden” name=”_finish” value=”true” />
Address: < input type=”text” name=”address”>< /br>
< spring:bind path=”pcb.address”>
< c:forEach var=”emsg” items=”${status.errorMessages}”>
< c:out value=”${emsg}”/>
< /c:forEach>
< /spring:bind>
Email: < input type=”text” name=”email”>< /br>
< spring:bind path=”pcb.email”>
< c:forEach var=”emsg” items=”${status.errorMessages}”>
< c:out value=”${emsg}”/>
< /c:forEach>
< /spring:bind>
Contact Number: < input type=”text” name=”contactNo”>< /br>
< spring:bind path=”pcb.contactNo”>
< c:forEach var=”emsg” items=”${status.errorMessages}”>
< c:out value=”${emsg}”/>
< /c:forEach>
< /spring:bind>
< input type=”submit” value=”Register”>< /br>
< /form>

Provide Success View –
----------------------------------------
JSP code (ur.jsp):-
< %@ taglib prefix=”c” uri=”http://java.sun.com/jstl/core” %>
< %@ taglib prefix=”spring” uri=”http://www.springframework.org/tags” %>
< %@ page isELIgnored=”true” %>
< % System.out.println(“--------ur.jsp--------“); %>
Successfully Register User < br>
User name = ${requestScope.urcb.userName} < br>
Age = ${requestScope.urcb.age} < br>
email = ${requestScope.urcb.email} < br>

The controller classes uses / depends upon the Servlet API and Spring API i.e. the controller classes can be used only as part of spring based web application. If we provide the business logic in the controller classes then we can’t reuse the business logic in the other application.

Spring with in a Day Part-7

Spring server side validation
------------------------------------------------------
Validation Rules:
• username is required and minimum length 5 characters.
• pwdOne an pwdTwo must be same.
• Age is required and must between 15 to 45

JSP code (urform.html):-
< %@ taglib prefix=”c” uri=”http://java.sun.com/jstl/core” %>
< %@ taglib prefix=”spring” uri=”http://www.springframework.org/tags” %>
< %@ page isELIgnored=”true” %>
< form method=”post” action=”ru.html”>
Name: < input type=”text” name=”username”>< /br>
Password: < input type=”text” name=”pwdOne”>< /br>
Retype Password: < input type=”text” name=”pwdTwo”>< /br>
Email: < input type=”text” name=”email”>< /br>
Age: < input type=”text” name=”age”>< /br>
< input type=”submit” value=”Register”>< /br>
< /form>


Command Class –
package pack;
public class UserRegCB {
String username;
String pwdOne;
String pwdTwo;
String email;
int age;
//add setter and getter for all properties
}

Note:
------------
class cat {}
class Rat {}
public class TessApp {
public static void main (String [] args) throws Exception {
Class c1 = Class.forName(“Cat”);
Class C2 = Class.froName(“Rat”);
System.out.println(Cat.class.isAssignableFrom(c1); //true
System.out.println(Cat.class.isAssifnableFrom(c2); //false
}
}
 Cat.class.isAssignableFrom() returns TRUE if the class c1 contains the information about Cat class or the information about the sub-class of the Cat class.


To take care of validation we must provide a class implementing the Validator interface.
package pack;
public class URCBValidator implements Validater {
public Boolean supports(Class cls) {
return pack.UserRegCB.class.isAssignableFrom(cls);
}
public void validate (Object cmd, Errors errors) {
UserRegCB cb = (UserRegCB) cmd;
If(cb.getUserName() == null || cb.getUserName().trim().equsals(“”)){
errors.rejectValue(“username”,”user.req.err”,”User is required”);
} else If(cb.getUserName().lenght < 5){
errors.rejectValue(“username”,”user.len.err”,
”User name less than 5 characters”);
}
If(cb.getPwdOne() == null || cb.getPwdOne().trim().equsals(“”)){
errors.rejectValue(“pwdOne”,”pwdOne.req.err”,
”Password is required”);
} else If(cb.getPwdTwo() == null || cb.getPwdTwo().trim().equsals(“”)){
errors.rejectValue(“pwdTwo”,”pwdTwo.req.err”,
”Password is required”);
} else If(cb.getPwdOne().equals(ch.getPwdTwo())){
errors.rejectValue(“pwdTwo”,”pwdTwo.same.err”,
”Retyped password is not same with Password”);
}
If(cb.getAge() == null || cb.getAge().trim().equsals(“”)){
errors.rejectValue(“age”,”age.req.err”,”Age is required”);
} else If(cb.getAge().lenght < 15 || cb.getAge().lenght > 45){
errors.rejectValue(“age”,”age.len.err”,”Age is not between 15 to 45”);
}
}
}

 The method supports() and Validate() will be called by the spring code.
 The supports() is used to check whether the Validator object can take care of validating the data available in a specific command bean object.
 And validate() is used to check whether the data is valid or not.

package pack;
public class URController extends AbstructCommandController {
public URController() {
this.setCommandName(“urcb”);
this.setCommandClass(UserRegCB.class);
this.setValidator(new URCBValidator());
}
protected ModelAndView handle (HttpServletRequest reuest,
HttpServletResponse response, Object cmd, BindException be)
throws Exception {
UserRegCB cb=(UserRegCB) cmd;
Map map = be.getModel();
ModelAndView mav=new ModelAndView();
mav.setViewName(“dispRes”);
mav.addAllObjects(map);
return mav;
}
}

spring-servlet.xml file –
< bean name=”/ru.htm” class=”pack.URController”>< /bean>

JSP code (dispReg.jsp):-
< %@ taglib prefix=”c” uri=”http://java.sun.com/jstl/core” %>
< %@ taglib prefix=”spring” uri=”http://www.springframework.org/tags” %>
< %@ page isELIgnored=”true” %>
< c:out value=”${requestScope.urcb.userName}”/>
< spring:bind path=”urcb.userName”>
< c:forEach var=”emsg” item=”${status.errorMessages}”>
< c:out value=”${emsg}” />< /br>
< /c:forEach>
< /spring:bind>

Spring with in a Day Part-6

How to Deals with the Form & Command bean object in Spring
-----------------------------------------------------------------------
In order to deals with the parameters in the query string or with the fields in the form we must use Command bean in as based application.


AbstructCommandController
----------------------------------------------------
i. AbstructCommandController implements the Controller interface. This class contains the code to deal with the command bean object.
ii. To deal with the above query string in our form we must provide the command bean support pone and ptwo properties.

package pack;
public class OCBean {
String pone;
String ptwo;
//add setter and getter methods
}

iii. Capture the data and putting the data ion our command bean object is call binding. Spring code used the setter methods provided in the bean class to bind the data in the command bean object.

JSP code (form.html):-
< %@ taglib prefix=”c” uri=”http://java.sun.com/jstl/core” %>
< %@ taglib prefix=”spring” uri=”http://www.springframework.org/tags” %>
< %@ page isELIgnored=”true” %>
< form action=”/fh.htm” method=”post”>
Field One < input type=”text” name=”pone”/>< br>
Field Two < input type=”text” name=”ptwo”/>< br>
< input type=”submit” value=”Send” />< br>
< /from>

iv. For dealing with the above from or to deal with the parameters of the query string in the URL is going bellow –
http://localhost:8080/swapp/fh.htm?pone=AAA&ptwo=BBB
we must use the command bean class shown above (OCBean.java)
v. For using the command bean we must provide the controller classes as the subclass of AbstructCommandController.

package pack;
public class OCController extends AbstructCommandController {
public OCController() {
this.setCommandName(“ocb”)_;
this.setCommandClass(pack.OCBean.class);
}
Protected ModelAndView handle (HttpServletRequest request,
HttpServletReqponse response, Object cmd, BindException be)
throws Exception {
OCBean cb=(OCBean) cmd;
System.out.println(“pone=”+cb.getPone());
System.out.println(“ptwo=”+cb.getPtwo());
return null;
}
}

vi. When form will be submitted the spring code that is part of AbstructCommandController takes care of –
 Capturing data provided by user
 Creates the command bean object
 Bind the data to the command bean object by calling the setter.
 Calls the handle() method.


BindException
-------------------------------
We must add the error code with the error messages in properties files as shown bellow –resone.properties file –
typeMismatch.ocb.pone = Field must be integer
typeMismatch.ocb.ptwo = Field must be float
err.one = Error message one
err.two = Error message two

applicationContext.xml file –
< bean id=”messageSource”
Class=”org.springframework.context.support.ResouceBundleMessageSource”>
< property name=”basename” value=”resone”>< /property>
< /bean>

spring-servlet.xml file –
< bean name=”/fh.htm” class=”pack.OCController”>< /bean>

package pack;
public class OCBean {
int pone;
float ptwo;
//add setter and getter methods
}
package pack;
public class OCController extends AbstructCommandController {
public OCController() {
this.setCommandName(“ocb”);
this.setCommandClass(pack.OCBean.class);
}
protected ModelAndView handle (HttpServletRequest reuest,
HttpServletResponse response, Object cmd, BindException be)
throws Exception {
OCBean cb=(OCBean) cmd;
Map map = be.getModel();
be.rejectValue(“pone”,”err.one”,”default message”);
be.rejectValue(“ptwo”,”err.two”,”default message”);

be.rejectValue(“ptwo”,”err.thr”,”default message”);
System.out.println(“ec=>”+be.getErrorCount());
System.out.println(“ec=>”+be.getAllErrors());
ModelAndView mav=new ModelAndView();
mav.setViewName(“despRes”);
mav.addAllObjects(map);
return mav;
}
}

Explanation for some statements –
----------------------------------------------------
Map map = be.getModel();
It returns a Map object that contains the command bean object and BindingResult object.


be.rejectValue(“ptwo”, “err.two”, “default message”);
add error and error message in the model. It search the error code in property file for error message. If error message available in property file for the error code it fetch that message in the error object. If it not available then it adds the default error message for the error code.


JSP code (dispRes.jsp):-
< %@ taglib prefix=”c” uri=”http://java.sun.com/jstl/core” %>
< %@ taglib prefix=”spring” uri=”http://www.springframework.org/tags” %>
< %@ page isELIgnored=”true” %>
< c:out value=”${requestScope.ocb.pone}” />< br>
< c:out value=”${requestScope.ocb.ptwo}” />< br>
< spring:bind path=”ocb.pone”>
< c:forEach var=”emsg” items=”${status.errorMessages}”>
< c:out value=”${emsg}”/>< br>
< /c:forEach>
< /spring:bind>
< spring:bind path=”ocb.ptwo”>
< c:forEach var=”emsg” items=”${status.errorMessages}”>
< c:out value=”${emsg}”/>< br>
< /c:forEach>
< /spring:bind>

The bind tag creates a variable named status and this variable point to BindStatus object. The BindStatus object contains the property called errorMessage and errorMessages.


Example:
---------------------
JSP code (urform.html):-
< %@ taglib prefix=”c” uri=”http://java.sun.com/jstl/core” %>
< %@ taglib prefix=”spring” uri=”http://www.springframework.org/tags” %>
< %@ page isELIgnored=”true” %>
< form method=”post” action=”ru.html”>
Name: < input type=”text” name=”username”>< /br>
Age: < input type=”text” name=”age”>< /br>
Weight: < input type=”text” name=”weight”>< /br>
DOB: < input type=”text” name=”dob”>< /br>
URL: < input type=”text” name=”webPg”>< /br>
Contact: < input type=”text” name=”contactNo”>< /br>
< input type=”submit” value=”Register”>< /br>
< /form>


Command Class –
package pack;
public class UserRegCB {
String username;
int age;
float weight;
java.util.URL webPg;
java.util.Date dob;
String contactNo;
//add setter and getter for all properties
}

As part of spring software various property editor classes are provided in the package org.springframework.beans.propertyeditors.

Note:
-----------------
 CustomDateEditor converts String into java Date object.
 ClassEditor converts String into java Class object.
 initBinder() is used to register BindEditor to bind the data to the Bean object.
 BindEditor is used to convert the data object to another object or data type.
 initBinder() is responsible to register CustomEditor with the binder.

spring-servlet.xml file –
< bean name=”/ru.htm” class=”pack.URController”>
< property name=”commandName” value=”urcb”>< /property>
< property name=”commandClass” value=”pack.UserRegCB”>< /property>
< /bean>

package pack;
public class URController extends AbstructCommandController {
protected void initBinder (HttpServletRequest request,
ServletRequestDataBinder binder) throws Exception {
Binder.registerCustomEditor(Date.class, new CustomDataEditer (
new SimpleDateFormat(“dd/MM/yyyy”),true));
}
protected ModelAndView handle (HttpServletRequest reuest,
HttpServletResponse response, Object cmd, BindException be)
throws Exception {
UserRegCB cb=(UserRegCB) cmd;
System.out.println(“user name=”+cb.getUserName());
Map map = be.getModel();
ModelAndView mav=new ModelAndView();
mav.setViewName(“dispRes”);
mav.addAllObjects(map);
return mav;
}
}

The binder object is responsible for binding the data to command bean by calling the setters. While binding the data it has to convert the string object into appropriate data types. For example, the dob field must be converted as java Date object. For converting data to appropriate type, the PropertyEditors will be used by the binder this is why we have use bind.registerCustomEditor() method.

Spring with in a Day Part-5

Internationalization (i18N)
----------------------------------------------
i. If an application can takes care of the differences the language, number format, date format, currency symbol etc that exist between different regions, then the application can called as internationalization application.
ii. Every almost operating system allows us to specify the regional setting or local settings like date format, language etc.
iii. The browser sends accept-language header as part of request. This header contains the local settings of the browser.


iv. We can use the code shown bellow for identifying the local setting of the browser –
< % java.util.Local loc;
Loc = request.getLocal();
out.print(loc,+”< br>”);
out.print(loc.getLanguage() +”< br>”);
out.print(loc.getCountry() +”< br>”);
%>
//checkLocalSettingofBrowser.jsp

v. request.getLocal() uses the value of Accept-Language header for creating the local object.
vi. As part of contain that send to the browser there will be parts that are not specific to the local and there are few parts are specific to the local.
abc.html (sjp for generating output en-us local)
< html>
< head>< title>Title en< /title>< /head>
< body>
< p> Para 1 en < /p>
< p> Para 2 en< /p>
< p> Para 3 en< /p>
< /body>
< /html>


vii. Providing multiple JSP for supporting different local as shown above complicate the development and the maintenance the application.
xyz.html (jsp for generating output fr-ca local)
< html>
< head>< title>Title fr< /title>< /head>
< body>
< p> Para 1 fr < /p>
< p> Para 2 fr < /p>
< p> Para 3 fr < /p>
< /body>
< /html>


viii. We should not place local specific resources in the JSP. There resources must be place in properties files.
ix. It is not recommended to place the html tags that are not specific to a local in properties files.

Procedure for implementing i18N application with Spring
----------------------------------------------------------------------------
i. Add the poperties files to WEB-INF/classes directory.
ii. Procedure for adding the properties files to the project –
 Select src directory in the package explorer
 Right click to get the popup menu
 Choose New => File
 In new file window provide the filename (resone.properies) and click on Finish button.

Note: MyEclipse creates resone.properties file in src directory and copied in classes directory.

Property file resone.properties :-
pone.title = Welcome in page 1
pone.prone = Para 1 in page 1
pone.prtwo = Para 2 in page 1
pone.prthr = Para 3 in page 1
pmsg = Copy file from {0} to {1} in page 1

Property file resone_fr.properties :-
pone.title = Welcome in page 1 for fr
pone.prone = Para 1 in page 1 for fr
pone.prtwo = Para 2 in page 1 for fr
pone.prthr = Para 3 in page 1 for fr
pmsg = Copy file from {0} to {1} in page 1 for fr

Property file restwo.properties :-
ptwo.title = Welcome in page 2
ptwo.prone = Para 1 in page 2
ptwo.prtwo = Para 2 in page 2
ptwo.prthr = Para 3 in page 2
pmsg2 = Copy file from {0} to {1} in page 2

Property file restwo_fr.properties :-
ptwo.title = Welcome in page 2 for fr
ptwo.prone = Para 1 in page 2 for fr
ptwo.prtwo = Para 2 in page 2 for fr
ptwo.prthr = Para 3 in page 2 for fr
pmsg2 = Copy file from {0} to {1} in page 2 for fr


iii. Configure ResourceBundleMessageSource bean in applicationContext.xml as shown bellow -
< bean id=”messageSource”
class=”org.springframework.context.support.ResourceBundleMessageSource”/>
< property name=”basenames” value=”resone,restwo”>< /property>
< /bean>

 The internal code of ResourceBundleMessageSource reads the properties file and places the info in the memory.
 If we place resources with the code XXX in resone and restwo then spring used the value of XXX available in resone.
 Use basename instead of basenames if you use single resource set in the application.

How use Message Resource in JSP
--------------------------------------------------
For using the resources from the JSP we must use input spring tag library and use the message tag as shown bellow –

JSP code (genOP.jsp):-
< %@ taglib prefix=”c” uri=”http://java.sun.com/jstl/core” %>
< %@ taglib prefix=”spring” uri=”http://www.springframework.org/tags” %>
< %@ page isELIgnored=”true” %>
< html>
< head>< title>< spring:message code=”pone.title”/>< /title>< /head>
< body>
< p>< spring:message code=”pon.prone”/>< /p>
< p>< spring:message code=”pon.prtwo”/>< /p>
< p>< spring:message code=”pon.prthr”/>< /p>
< p>< spring:message code=”pmsg” arguments=”dirOne,dirTwo” />< /p>
< /body>
< /html>

dirOne will be used in place of {0} and dirTwo will be used in place of {1}. message tag of spring tag library checks the locale the browser that has sent the request and picks up the appropriate value for the resource and send it to the browse.

Spring with in a Day Part-4

View in spring
---------------------------
i. In a spring based application a model object is responsible to hold the data and this model object is used by the view component for rendering / generating the output.
ii. The internal code of AbstructController of handlerRequest() method takes care of setting the property the view or browser (check particular type request mustbe handled or not) and calling handleRequestInternal() method.

Example 1.
-------------------
package pack;
public class HellowWorldController extends AbstructController {
public HellowWorldController() {
String rmets[] = new String [2];
rmets[0]=”GET”;
rmets[0]=”POST”;
this.setSupportedMethods(rmets);
this.setCatcheSecond(300);
}
Protected ModelAndView handleRequestInternal (HttpServletRequest request,
HttpServletResponse response) throws Exception {
ModelAndView mav = new ModelAndView();
mav.setViewName(“one”);
mav.addObject(“ourModel”,”Hello world”);
return mav;
}
}


The following steps will be carried out when the browser send the request /hellowWorld.htm given bellow:-
------------------------------------------------------------------------------------
i. Web container creates request, response object.
ii. Web container starts the execution of spring code available in DispatcherServlet by passing request, response object.
iii. The spring code calls the handleRequest() on HellowWorldContoller by passing request, response object.
iv. The JVM starts the execution of AbstructController class handdleRequest() method and it internally calls the handleRequestInternal() method.
v. The JVM starts the execution of handleRequestInternal() and creates ModelAndView object, pass the model and view in the object and return to the spring code.
vi. The spring code stores the model object in the request object with the attribute name ‘ourModel’.
vii. By using InternalResourceViewResolver ‘one’ will be converted as /pages/one.jsp.
viii. Spring code forward the request to the one.jsp and this JSP receives request and response object.
ix. Finally the browser receives the output generated by one.jsp that is acts as the view components.
x. The combination of DispatcherServlet and HellowWorldController acts as the controller component.


JSP code (one.jsp):-
Output of the one.jsp < br>
< %= request.getAttribute(“ourModel”); %> < br>
Model object => ${requestScope.ourModel} < br>
< % System.out.println(“------one.jsp---------“);

Example 2.
------------------------
We can use any type of object as a model object i.e. we can use a vector object as a model in place of string object. In the erlyer application we have used only one string object as a model object. Spring allows us multiple objects as model object.

Bean add in spring-servlet.xml -
< bean name=”/slist.htm” class=”pack.COne”>
< property name=”cacheSeconds” value=”0”>< /property>
< property name=”supportedMethods” value=”GET,POST”>< /property>
< /bean>

package pack;
public class COne extends AbstructController {
protected ModelAndView handleRequestInternal (HttpServletRequest request,
HttpServletResponse response) throws Exception {
ModelAndView mav = new ModelAndView();
Mav.setViewName(“genRep”);
//code to get list
Vector slist = new Vector();
slist.add(“one”);
slist.add(“two”);
mav.setObject(“sl”, slist);
return mav;
}
}


JSP code (genRep.jsp):-
< %@ taglib prefix=”c” uri=http://java.sun.com/jstl/core%>
< %@ page isELIgnored=”true” %>
Output of the genRep.jsp < br>
List content < br>
< c:forEach var=”sname” items=”${requestScope.sl}” >
< c:out value=”${sname}” />< br>
< /c:forEach>
< % System.out.println(“------genRep.jsp---------“);


Example 3.
----------------------------
Bean add in spring-servlet.xml -
< bean name=”/slist.htm” class=”pack.CTwo”>
< property name=”cacheSeconds” value=”0”>< /property>
< property name=”supportedMethods” value=”GET, POST”>< /property>
< /bean>

package pack;
public class CTwo extends AbstructController {
protected ModelAndView handleRequestInternal (HttpServletRequest request,
HttpServletResponse response) throws Exception {
ModelAndView mav = new ModelAndView();
Mav.setViewName(“genOP”);
//code to get map
Map < String, Object> mm = new Map < String, Object>();
mm.put(“mone”,”one”);
mm.put(“mtwo”,”two”);
mm.put(“mthr”,”thr”);
mav.setAllObjects(mm);
return mav;
}
}

The spring code stores the reference of the object available in the Map as part of request object before forward the request JSP.


JSP code (genOP.jsp):-
< %@ taglib prefix=”c” uri=”http://java.sun.com/jstl/core” %>
< %@ page isELIgnored=”true” %>
Output of the genOP.jsp < br>
< c:out value=”${requestScope.mone}” />< br>
< c:out value=”${requestScope.mtwo}” />< br>
< c:out value=”${requestScope.mthr}” />< br>
< % System.out.println(“------genRep.jsp---------“);


User define view class as view component (Our view class as view component):-
-----------------------------------------------------------------------------------
i. Spring is very flexible it allows us to use our own view classes for generating the output in place of the JSP.
ii. When we want to use our won view class then we use the method setView() in place of setViewName().
iii. A class that provides the implementation of org.springframework.web.servlet.View interface is called as view class.
iv. There is two methods in View interface.
=> getContentType() : should return a string indicating the type of contain ( text /xml, image/ JPG, text/html etc).
=> render() : as part of this method we must provide the code to generate the output has be send to the browser.


Example 4.
-------------------------
Bean add in spring-servlet.xml -
< bean name=”/slist.htm” class=”pack.CThr”>
< property name=”cacheSeconds” value=”0”>< /property>
< property name=”supportedMethods” value=”GET,POST”>< /property>
< /bean>

package pack;
public class CThr extends AbstructController {
protected ModelAndView handleRequestInternal (HttpServletRequest request,
HttpServletResponse response) throws Exception {
ModelAndView mav = new ModelAndView();
Mav.setViewe(new pack.OurView());
//code to get map
Map < String, Object> mm = new Map < String, Object>();
mm.put(“mone”,”one”);
mm.put(“mtwo”,”two”);
mm.put(“mthr”,”thr”);
mav.setAllObjects(mm);
return mav;
}
}


package pack;
public class OurView implements View {
public String getContextType() {
return “text/html”;
}
Public void render( Map mm, HttpServletRequest request,
HttpServletResponse response) throws Exception {
PrintWriter out = response.getWriter();
out.print(mm.get(“mone”));
out.print(mm.get(“mtwo”));
out.print(mm.get(“mthr”));
}
}
In case of above application instead of forwarding the reuest to the JSP file spring executes the render() on the View object.

User define view class as view component (Our PDF view class as view component):-
---------------------------------------------------------------------------
i. We can use our own view classes for generating the output in PDF format, XML format etc. For this, we must provide our own view classes as the sub classes of AbstructPdfView, AbstructJxlView.
ii. AbstructPdfView class implements the View interface. The render() method is provided in this class and the internal code of this class calls buildPdfDocument().


Example 5.
--------------------
Bean add in spring-servlet.xml -
< bean name=”/slist.htm” class=”pack.Cfiv”>
< property name=”cacheSeconds” value=”0”>< /property>
< property name=”supportedMethods” value=”GET,POST”>< /property>
< /bean>

package pack;
public class CFiv extends AbstructController {
protected ModelAndView handleRequestInternal (HttpServletRequest request,
HttpServletResponse response) throws Exception {
ModelAndView mav = new ModelAndView();
Mav.setViewe(new pack.GenPdfView());
//code to get list
Vector slist = new Vector();
slist.add(“one”);
slist.add(“two”);
mav.setObject(“sl”, slist);
return mav;
}
}


package pack;
public class GenPdfView extends AbstructPdfView {
protected void buildPdfDocument( Map model, Document doc, PdfWriter writer,
HttpServletRequest request, HttpServletResponse response)
throws Exception {
Vector v=(Vector) model.get(“sl”);
Chunk heading = new Chunk( “List od Data”);
heading.setBackground(Color.RED);
heading.setUnderline(5.5f, -3f);
doc.add(heading);
Paragraph para = new Paragraph)(;
for(int i=0; i< v.size(); i++) {
para.add(v.get(i));
para.add(“\r\n”);
}
doc.add(para);
}
}

Spring with in a Day Part-3

Procedure to create a web application with Spring in MyEclipse:-
--------------------------------------------------------------------------------------
1. Chose File => new =>project.
2. In the new project window select web project => click on the next button.
3. In new web project window provide project name (exmp: swproj) web root folder (exmp:swap), context root URL (exmp: /swap) and check Add JSTL check box and click on Finish button.
4. Choose swproj in package explorer and choose MyEclipse => Add Spring Capabilities.
5. In Add Spring Capabilities window check all the check boxes except hibernate2, select copy checked lib contains radio button => next button.
6. Click on the Browse button and select WEB-INF (swproj/awapp/web-inf) => OK button => Finish button.
7. Create a file with the name spring-servlet.xml under WEB-INF directory by copy applicationContext.xml.
8. Add the following information in web.xml
< context-param>
< param-name>contextConfigLocation< /param-name>
< param-value>/WEB-INF/applicationContext.xml< /param-value>
< /context-param>
< listener>
< listener-class>
org.springframework.web.context.ContexLoaderListener
< /listener-class>
< /listener>
< servlet>
< servlet-name>spring< /servlet-name>
< servlet-class>org.spring.web.servlet.DispatcherServlet< /servlet-class>
< /servlet>
< servlet-mapping>
< servlet-name>spring< /servlet-name>
< url-pattern>*.htm< /url-pattern>
< /servlet-mapping>
9. Add the information shown bellow in spring-servlet.xml file
< bean id=”jspViewResolver”
class=”org.springframework.web.servlet.view.InternalResourceViewResolver”>
< property name=”viewClass”>
< value> org.springframework.web.servlet.view.JstlView< /value>
< /property>
< property name=”prefix” value=”/pages”>< /property>
< property name=”suffix” value=”.jsp”>< /property>
< /bean>
< bean name=”/hellowWorld.htm” class=”org.students.HellowWorldController”>< /bean>


ContextLoaderListener
---------------------------------
i. ContextLoaderListener implements ServletContextListner.
ii. When a spring based application is started the web container calls the ContextInitialized() of ContextLoaderListener class.
iii. The spring code of this method creates a spring container (parent container) and this container reads the info available in applicationContext.xml

Example
---------------
public class ContextLoaderListener implements ServerContextListener {
………. contextInitialized (… … …) {
// 1) code to get the value of contextConfigLocation param
// 2) code to create spring container by passing contextConfigLocation …….
// (WEB-INF/applicationContext.xml is used as the value of
// contextConfigLocation by most of the developers)
}
…………. contextDestroyed(… … …) {
//code for unrefetence the listener object
}
}


DispatcherServlet
---------------------------
i. The internal code of the DispatcherServlet creates second spring container (child container). This container reads the information from spring-servlet.xml
ii. The first container acts as the parent of the second container. The child container will be able to pick up the beans from the parent container.
iii. DispatcherServlet as the same of ActionServlet in Struts.
iv. The web container executes the spring code available in dispatcherServlet when receives the request that is send using the URL that is ends with .htm.


Controller class
-------------------------
i. As part of the spring based web application, several controller classes will be provided by us.
ii. A controller is a class that provides the implementation of org.springframework.web.servlet.mvc.Controller abstruct interface.

Example
--------------------
package pack;
public class HellowWorldController extends AbstructController {
protected ModelAndView handleRequestInternal (HttpServletRequest reuest,
HttpServletResponse response) throws Exception {
ModelAndView mav=new ModelAndView();
Mav.setViewName(“one”);
Return mav;
}
}


Note: HellowWorldController class is the controller class here that is indirectly implemented controller interface.

Spring with in a Day Part-2

Spring DAO Module:
---------------------------------------
i. We can use JDBC, Hibernate, TopLink, JPA etc for accessing database from spring based application.
ii. Spring provides some class for different ORM technologies link JdbcTemplate, HibernateTemplate, TopLinkTemplate, JpaTemplate etc.
iii. As part of spring the class with the naming pattern xxxTemplate (JdbcTemplate, HibernateTemplate etc.) is provided. These classes simplify the development of the application that has to use the database.

Note:
* Datasource manages the set of connection pool
* Connection pool is the set of connection mint for the performance of the database connection
* Apache people provides the DataBaseConnetionPool(DBCP) to maintain database connection pool.


JDBC in Spring
---------------------------------
i. JdbcTemplate internally uses the DataSource that is responsible for maintaining the connection pool.
ii. DBCP software is provided by Apache (apache.org) is can use for configuring the connection pool.
iii. For using DBCP the following jar files are required –
=> commons-dbcp-1.2.2.jar
=> commons-pool-1.3.jar
=> commons-collections-3.2.jar


iv. The JdbcTemplate uses the DataSource object whenever database operation has to be performed the jdbcTemplate picks up the connection from ConnectionPool using the DataSource object.
v. < bean id="dataSource" class="org.springframework.jdbc.datasource.DriverManagerDataSource"
lazy-init="default" autowire="default" dependency-check="default">
            < property name="driverClassName" value="com.mysql.jdbc.Driver" />
            < property name="url" value="jdbc:mysql://localhost:3306/testDB" />
            < property name="username" value="root" />
            < property name="password" value="root" />
< /bean>
vi. < bean id=”jtb” class=”org.springframework.jdbc.core.JdbcTemplate”>
             < properties name=”dataSource”>
                    < ref bean=”dataSource”>< /ref>
             < /properties>
     < /bean>

Example:
------------------
package pack;
public class SprApp {
      public static void main(String [] args) {
            ApplicationContext sprCont=new ClassPathXmlApplicationContext(“applicationContext.xml”);
            JdbceTemplate jt=(JdbcTemplate) sprCont.getBean(“jtb”);

            //non parameterized query
            String nonParamSqlQuery=”insert into Emp values (1,’eone’,1000)”;
            Jt.update(nonParamSqlQuery);

            // parameterized query
            String paramSqlQuery=”insert into Emp values(?,?,?)”;
            Object param[] =new Object[3];
            param[0]=”100”;
            param[1]=”EHun”;
            param[2]=”12345”;
            jt.update(paramSqlQuery,param);
      }
}

ResultSetExtractor
-----------------------------------
• ResultSetExtractor is an interface; we must implements this interface to deal with the data obtained with database.
• As part of the spring, Template design pattern is used for the design of the classes like JdbcTemplate, HibernateTemplate etc.
• A Template document is a simple document. When we want to create a new document we can fill in the blanks that are part od the template document.
• In case of template design pattern, part of the code is provided as part of the classes like JdbcTemplate and we can provide part of the code by implementing the interfaces like ResultSetExtractor (providing the classes implementing interfaces are similar to filling the blanks in the pattern template document).


Example:
-------------------------
package pack;
public class OurRsExt implements ResultSetExtractor {
      public Object extractData(ResultSet rs) throws SQLException,DataAccessException {
            while(rs.next()){
                   //set the value in object
                   System.out.println(“data=”+rs.getString(1));
            }
            return null;
     }
}
package pack;
public class SprApp {
      public static void main(String [] args) {
            ApplicationContext sprCont=new ClassPathXmlApplicationContext(“applicationContext.xml”);
            JdbceTemplate jt=(JdbcTemplate) sprCont.getBean(“jtb”);

             //select query
             String selectSqlQuery=”select * from Emp”;
             Jt.query(vsql, new OurRsExt());
       }
}

Hibernate in Spring
----------------------------------------
i. We need to use HibernateTemplate object for accessing the data using Hibernate API from the spring based application.
ii. HibernateTemplate depends upon SessionFactory that is depends upon DataSource object.


iii. < bean id="dataSource"
class="org.springframework.jdbc.datasource.DriverManagerDataSource"
lazy-init="default" autowire="default" dependency-check="default">
             < property name="driverClassName" value="com.mysql.jdbc.Driver" />
             < property name="url" value="jdbc:mysql://localhost:3306/testDB" />
             < property name="username" value="root" />
             < property name="password" value="root" />
      < /bean>
iv. < bean id="sessionFactory" class="org.springframework.orm.hibernate3.LocalSessionFactoryBean">
            < property name="dataSource">
                    < ref bean="dataSource" />
            < /property>
            < property name="configLocation">
                    < value>hibernate.cfg.xml< /value>
            < /property>

            < property name="configurationClass">
                    < value>org.hibernate.cfg.AnnotationConfiguration< /value>
            < /property>
            < property name="hibernateProperties">
                    < props>
                            < prop key="hibernate.dialect">org.hibernate.dialect.MySQLDialect < /prop>
                    < /props>
             < /property>
      < /bean>
v. < bean id="htb"class="org.springframework.orm.hibernate3.HibernateTemplate">
            < property name="sessionFactory">
                    < ref bean="sessionFactory" />
            < /property>
< /bean>

Example
---------------------
package pack;
public class SprApp {
      public static void main(String [] args) {
            ApplicationContext sprCont=new ClassPathXmlApplicationContext(“applicationContext.xml”);
            HibernateTemplate jt=(HibernateTemplate) sprCont.getBean(“htb”);
          
             //insert operation
             Employee e=new Employee();
             e.setEno(new Long(1));
             e.setEmpName(“Eone”);
             e.setSalary(new Double(12345));
             ht.save(e);

             //select or load operation
             Employee el=new Employee();
             ht.load(el,new Long(1));

             //delete operation
             Employee ed=new Employee();
             ht.load(ed,new Long(1));
             ht.delete(ed)

             //update operation
             Employee eu=new Employee();
             ht.load(eu,new Long(1));
             eu.setSalary(new Double(23456));
             ht.update(eu);

             //select or load operation without primary key
             String selectQry=”from Employee”;
              List< Employee> employeeList=ht.find(selectQry);
      }
}
vi. HibernateTemplate object.find() method can be used for executing the HQL statement. Internally Query object will be created and execute the Query object to fetch the record.

Thursday, October 21, 2010

Spring with in a Day Part-1

Frameworks
---------------------------------
For a small scale project, we can use JSP model-I architecture but in case of large scale project, this model is not suitable. We can use the framework like Struts, Spring etc. These framework contains the code i.e. commonly required as part of our application and the framework provides the process the carried out various task in the implementation of our project.

Difference between Struts & Spring
-------------------------------------------------------
> Spring framework is more flexible than Struts framework.
> Struts can be used for the development of the web application only but Spring can be used for the development of GUI, web application, applets etc.
> EJB containers can automatically control the transaction (the developer need not write the code or start/end the application). The same kind of feature is provided as part of Spring but is not available as part of Struts.
> Spring supports AOP but Struts cannot.

Spring
--------------------------
Spring framework is very flexible and it is divided into multiple modules. As part of our project we need not use all the modules of spring. Depending upon our requirement we can choose appropriate module.

Note:

=> CX (part of module Y) uses COne and CTwo (part of X module).
=> CA (part of Module Z) uses CThr (part of X module).
=> Module Y and module Z (part of the top layer) uses/takes the supports of/depends upon module X that is the part of bottom layer.


public class CX {
           public void method1(){
                      COne cone=new COne();
                      CTwo ctwo=new CTwo();
                       ................
           }
}
public class CA{
           public void method2(){
                      CThr cthr=new CThr();
                        ................
           }
}


Spring Diagram
--------------------------------


Dependency Injection:
---------------------------------------
Dependency Injection (DI) is the process to give the dependency to the other object by setter or constructor injection.
As example, Address object depends upon/uses three String objects; the setter provides the dependent objects to the Address object. This process is giving the dependencies to the Address object is called Dependency Injection.


package pack;
public class Address{
           String flatNo;
           String Street;
           String city;
           //add setter and getter for all properties
}

pack.Address add=new pack.Address();
add.setFlatNo(“D-30/A/12, Bong Appartment”);
add.setStreet(“Park Street”);
add.setCity(“Kolkata-01”);


Inversion of Control
------------------------------------
i. Spring framework can take care of creating the Address object, the three objects and injecting dependencies using setter injection or constructor injection.
ii. Normally the developer need to write the code to create the object and inject the dependencies (we have to provide the code for controlling the process of the setting the dependencies). If we leave the job of setting the dependency to spring and spring will be able to control the process of setting of the dependencies. The process of leaving the job or setting of the dependencies to spring is called as Inversion of Control (IOC).
iii. For using dependency injection (DI) feature provided by spring we must provide the info about the spring bean in applicationContext.xml

Bean for Address object in applicationContext.xml
< bean id=”address” class=”pack.Address”>
        < property name=”flatNo”>
                < value type=”java.lang.String”> D-30/A/12, Bong Appartment< /value>
        < /property>
        < property name=”street”>
               < value type=”java.lang.String”> Park Street< /value>
        < /property>
        < property name=”city”>
               < value type=”java.lang.String”>Kolkata-01< /value>
        < /property>
< /bean>


Spring Container
----------------------------------
> As part of spring, spring container is provided.
> Spring Container is an object which provides the implementation of BeanFactory interface.
> Spring Container is a java object that provides the implementation org.springframework.beans.factory.BeanFactory interface.
> We can use org.springframework.core.io.ClassPathResource object for picking up the resources (applicationContext.xml) from the CLASSPATH.
> ClassPathResource implemants Resource interface.
> The spring container will able to create the objects and able to setup the dependencies between the objects.

*Note: CLASSPATH: CLASSPATH is a list of directoried and jar files that contains the classes.


Example:
-----------------
packatge pack;
public class SprApp{
     public static void main(String[] args){
         Resource res=new ClassPathResource(“applicationContext.xml”);
         BeanFactory sprCont=new XmlBeanFactory(res);
         Object obj=sprCont.getBean(“address”);
         pack.Address add=(pack.Address)obj;
         System.out.println(“city=”+add.getCity());
    }
}

Explanation
-------------------------------
> The method getBean() returns the Address object as Object data type.
> the Spring Container maintains only one Address object with id as address. Even if we call the getBen() multiple times the spring container will returns the reference of same Address object.
           BeanFactory sprCont=new XMLBenaFacotory(new ClassPathResource(“applicationContext.xml”));
           Object objOne=sprCont.getBean(“address”);
           Object objTwo=sprCont.getBean(“address”);
> The above code gets the reference of a single Address object if scope is set to “singleton”.


> The above code gets the refrence of the two Address object if scope is set to “prototype”.


Note:
• In case of web application we can use the values request, session for the scope attributes.
• In place of id sttributes we can use name attribute also. The xml editor considers there is an error if we provide the same value for multiple id attributes.


ApplicationContext
-------------------------------------
> ApplicationContext is an interface that extends the BeanFactory interface provided by spring.
> Context package build on the top of Bean package and context contains the ApplicationContext is the sub-interface of BeanFactory interface.
> ApplicationContext i.e. Context package provides the advance functionalities like support for i18N application development and Aspect Oriented Programming (AOP).


Code for Spring Container using core module:-
Resource res=new ClassPathResource(“applicationContext.xml”);
BeanFactory sprCont=new XmlBenaFactory(res);
Or
BeanFactory sprCont=new XmlBeanFactory(new ClassPathReaource(“applicationContext.xml”));

Code for Spring Container using context module:-
ApplicationContext sprCont=new ClassPathXmlApplicationContext(“applicationContext.xml”);

Lazy & Eger Bean Creation:-
--------------------------------------------
i. The spring container supports the process of Lazy creation an bean object or eagerly creation bean object.
ii. We can ask the bean container to eagerly created object using the configuration show bellow-
       a) < bean id=”address” class=”pack.Address” scope=”singleton” lazy-init=”false”>< /bean>
When the above configuration is used spring container create the bean object when application creates the container.
       b) < bean id=”address” class=”pack.Address” scope=”singleton” lazy-init=”true”>< /bean>
When we use lazy-init=”true” the container create the bean object when the getBean() will be call the first time.
Note: *Lazy-init attributes will be used when scope=”singleton”.

Wiring or Bean Wiring
----------------------------------------
i. The process of setting up the dependencies is called as wiring.
ii. Setting the dependency injection between two objects is called the wiring.
iii. The spring container will take care of creating various objects and setting between different object as shown bellow.


package pack;
public class Emp{
      int empNo;
      String empName;
      Address addr;
      // add setter and getter for all properties
}

< bean id=”eb” class=”pack.Emp”>
        < property name=”empNo”>
               < value type=”int”> 100< /value>
        < /property>
        < property name=”empName”>
               < value type=”String”>EmpName< /value>
        < /property>
        < property name=”addr”>
               < /ref>
        < /property>
< /bean>


Auto Wiring
---------------------------------
In this process spring automatically inject or wire the bean properties to create the bean that is using another bean as property. In our bean we are not provide the existing bean as property but provide the configuration using autowire attribute as byname, byTime, byType.

byName=>search the bean with same name of the property and inject it in the bean. If it is not available container throws the exception.
byType=>search the bean with same data type of the property and inject it in the bean. If not available the throws the exception.
byTime=>search the bean with same name of the property if available inject it. If it is not available then it searches the bean by data type. if it is available inject that bean neither throws the exception.


Constructor Injection
-----------------------------------------
Spring container supports constructor injection for the injecting the dependencies.
For using constructor injection add a constructor to the Address class as shown bellow –


package pack;
public class Student {
      String name;
      String address;
      String email;
      public Student(String name, String address, String email){
            this.name=name;
            this.address=address;
            this.email=email;
      }
      //add setter and getters for all properties
}


< bean id=”student” class=”pack.Student”>
        < constructor-arg index=”0” type=”java.lang.String”>
                < value type=”java.lang.String”> StudentName < /value>
        < /constructor-args>
        < constructor-arg index=”1” type=”java.lang.String”>
                < value type=”java.lang.String”> StudentAddress < /value>
        < /constructor-args>
        < constructor-arg index=”2” type=”java.lang.String”>
                < value type=”java.lang.String”>student@school.com < /value>
        < /constructor-args>
< /bean>